Being a famous CMS platform, WordPress is the core of thousands of websites – if not millions. It further helps you to deploy not just the end-to-end CMS platform but other forms too. The increasing trend of using WordPress with frameworks, such as Next.js and React, enable any platform to become more flexible.
Due to its high flexibility, WordPress is feasible for high-availability deployment. Just because of the services, such as AWS, there’s no need to work about setting up a complicated series of cloud instances. You can conveniently have a WordPress website that can maintain its cluster while scaling fluidly. To develop a high-availability WordPress site, you require external storage through Amazon EFS. It can also work through the automation process via the AWS Elastic Beanstalk.
What We’ll Cover
In this article, we are going to share the ways to deploy and set up a high-availability cluster through Amazon’s Elastic File System (EFS) and Docker Swarm.
You can follow the given steps to install WordPress site on the Docker Swarm:
- Create EFS volume
- Globally mounting EFS
- Form RDS database
- Deploying WordPress
- Scaling WordPress
Since WordPress is a very popular CMS in the world, it has around 60-percent of the market share. Being WordPress users, we share with your a DIY approach for replicating the technology for automating the formation of HA WordPress with Docker Swarm.
However, one persistent issue with WordPress is that it doesn’t scale well, still, so many high-traffic websites depend on it. But we will solve the problem by using a very simple stack including Docker Swarm, EFS, and more.
But before getting started, let’s know about its robustness.
How Robust Can This Platform Be?
It’s very interesting to know how this platform can easily be set up. AWS Elastic Beanstalk gives you a great environment for using the platform that’s available out-of-the-box.
Instead of depending on a single cloud system, Elastic Beanstalk can automatically configure the given servers in distinct AWS Availability Zones. It can also set up the Elastic Load Balancing for better load management. The designed website further uses the Amazon Elastic File System (EFS) as a shared storage system for uploaded plugins, files, and themes.
Furthermore, the basic storage setup is highly capable of managing heavy loads. However, you can take the configuration to the next step by integrating better Amazon CloudFront distribution. Also, you can use the Memcache by integrating certain plugins, such as W3 Total Cache along with Amazon ElastiCache.
Prerequisites for WordPress Cluster
For creating WordPress Cluster, you first need to keep a few things in place already:
- AWS account
- Docker Swarm setup
- High-availability stack
- SSH access to each EC2 instance
You can use Ubuntu 14.04 LTS to run kernel 3.13.0-91-generic. However, this process works similarly to many Debian-based operating systems. So, it’s recommended to have a better understanding of properly building up the stack. It can further install the Docker Swarm and for that already need to have some essentials with you.
Develop EFS Volume in AWS Console
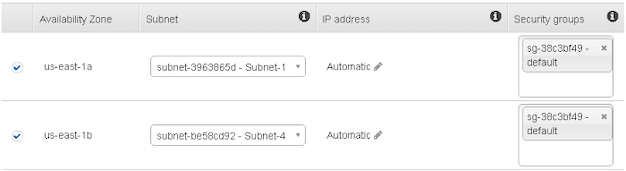
You have to log in to the AWS Console while navigating to EFS > Develop file system. Further, select the VPC while assigning mount targets as per the Availability Zones where the instances are located.
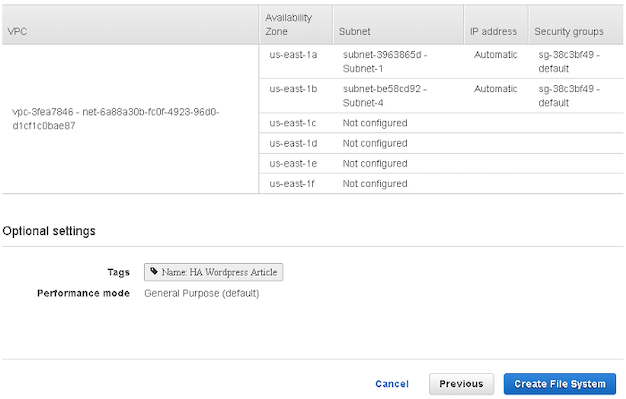
The next step of the EFS wizard is not compulsory. But it lets you assign tags to the file system.
In the third step, you need to review the settings and further click Create File System.
Alter Proper Firewall Rules on the EFS Security Group
For beginning further, you need to have a security group for Swarm workers and Swarm masters.
You need to add both the Swarm security groups to your new EFS security group. It enables inbound traffic over its NFS protocol. Now, click on Edit under the Inbound tab.
Then, add one NFS (port 2049) inbound rule on each security group of the Docker Swarm security. Once done, it must appear like the image given below.
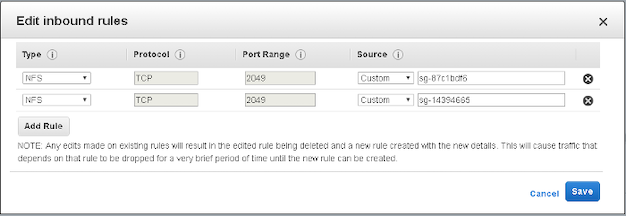
These two must be the only entries on the system. Further, we suggest you not allow all web traffic for better security reasons.
Next, Click Save.
Install NFS and Create Mounts For WordPress Clusters
You need to open a terminal client, SSH in each EC2 instance when forming a cluster. After that, run the given commands on each machine.
But first, you need to install all the NFS drivers.
sudo apt-get install nfs-common
On each machine, build a file system directory.
sudo mkdir /mnt/efs
Install the EFS file system with the use of DNS address (replace <> brackets).
sudo mount -t nfs4 -o
nfsvers=4.1,rsize=1048576,wsize=1048576,hard,timeo=600,retrans=2 :/ /mnt/efs
On every instance ensure the DNS for a target mount lies in the similar Availability Zone. It further makes sure that the system has the lowest possible latency.
You can even verify the mount in various ways. You can check it using a plain mount or findmntcommand. However, the df -h will offer you better human-readable output, as given below:

Make WordPress Directory Within the EFS Mount
You must type sudo mkdir –p /mnt/efs/wordpress into the terminal. You must do it on one machine, as all instances have the mounted EFS volume.
It is easy to verify other instances in the cluster that have better access to the directory. It’s possible by simply typing ls /mnt/efs on every host.
Mounting the Volume at Boot
It is easier to mount the EFS volume at the boot automatically. It’s possible by simply adding a line in the given /etc/fstab file on every instance. It is an optional step, however, it’s highly recommended.
If you don’t take this step, the mount disappears from the system on reboot. And, you again have to manually mount this volume.
sudo nano /etc/fstab
Add the following line to the end of your fstab file:
:/ /mnt/efs nfs4
nfsvers=4.1,rsize=1048576,wsize=1048576,hard,timeo=600,retrans=2,_netdev 0 0
You can confirm it with ease by simply performing a reboot. And, then you need to verify the mounted volume.
Setup RDS Database For WordPress Cluster
WordPress needs a relational database. For this, MySQL is so far the very popular option. However, other options, such as PostgreSQL and MariaDB, also work fine (but you require extra plugins for it). But mostly MySQL is a preferable choice.
In the AWS Console, you need to navigate to RDS > Form a DB instance.
Choose MySQL > Community Edition. On your next screen, you are often prompted for selecting an environment as per the intended usage. Next, select the production.
Further, check out the screenshot given below for seeing how to set up the RDS database.
Next, you need to remember the need for a Multi-AZ RDS database. It further includes a fault tolerance at its database level. Remember that if you further elect not to use the Multi-AZ, the database costs are further cut in half. But the given stack may have a single point of your failure.
AWS suggests a minimum of 100 GB of storage if you utilize a general-purpose SSD.
For example, you can use a proper db.t2.medium instance size. However, your specific requirements may vary. One of the advantages of utilizing RDS is that you need to change instance size later on with significantly minimal disruption.

Click Next Step.
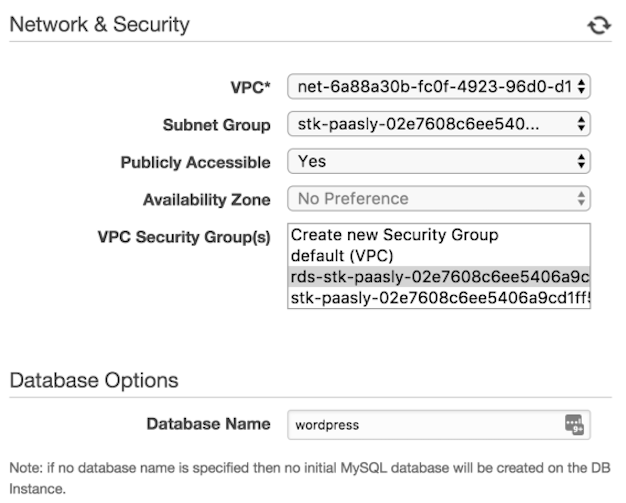
It’s time to take step 4. it’s the final step for building your RDS database. Next, select the VPC that you have to use for creating the EFS volume along with EC2 instances.
You may create a specific security group that’s specifically used for RDS or utilize the default VPC security group. Further, the EC2 instances require more inbound access on port 3306. it’s elected to use a new security group for separating things a bit more.
Now, give the database a unique name, such as WordPress.
Click Launch.
Deploy WordPress
In the terminal, you need to run the given commands on the Swarm Master nodes.
(Note: You need to replace the bracketed <> items).
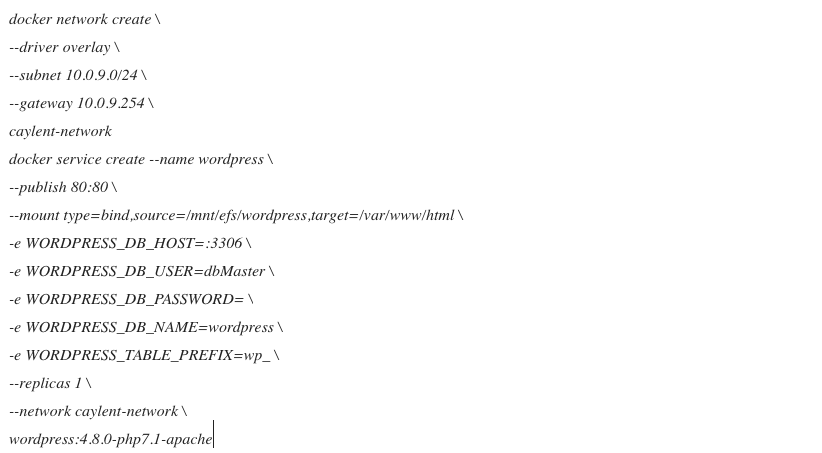
Don’t stress about using only running just one container for the moment. You need to scale this service soon after finishing the WordPress setup.
Modify Directory Permissions
You have to change the folder and file permissions on a given WordPress directory for enabling proper read/write/execute access.
cd /mnt/efs/wordpress
sudo chown www-data:www-data -R *
Next, sudo find . -type d -exec chmod 755 {} \;
sudo find . -type f -exec chmod 644 {} \;
Finalize WordPress Installation
Now, you need a clean installation process for running WordPress.
You need to locate the machine that’s running the singular WordPress container. Next, run the docker service ps wordpress in the terminal. It helps you to see which specific host your containing runs on.
But what if the container is not running on a given machine you are using currently? You need to find the corresponding public IPv4 address from your AWS console.
Also Read: HOW TO ADD SCHEMA MARKUP TO YOUR WORDPRESS WEBSITE
Next, fire up the browser and direct it to the public IP. You will now be greeted with a WordPress setup page.
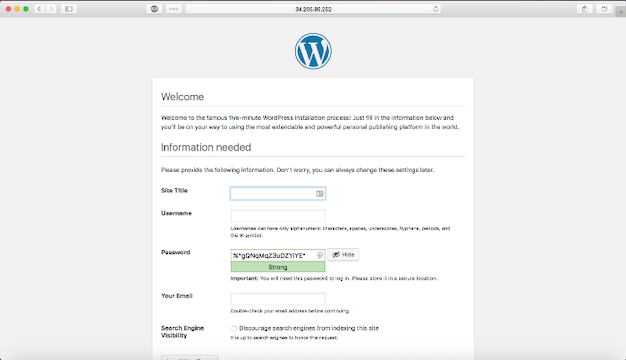
Finally, you get a full-fledged high-availability WordPress cluster that’s backed by EFS and Docker Swarm.
Scaling WordPress
After getting a proper WordPress setup, you need to scale the service.
$ docker service scale wordpress=10
wordpress scaled to 10
Conclusion
By now, you are clear about the step-by-step techniques to create a high-availability WordPress cluster with EFS and Docker Swarm.
It covers a general N+1 redundant setup, which can very well handle single failures at each level – compute, network, storage, or database.
If you want to automate this whole process, then you need to learn about Caylent, a SaaS platform for making it easier to deploy apps, such as WordPress, within the AWS account. This platform even automates the whole process that’s covered here. The best part is that it’s free of cost.